FIRE STROBE 2000 INSTALLATION INSTRUCTIONS
I. SITE INSPECTION FOR INSTALLATION
1. Carefully inspect the area where the Fire Strobe 2000 will be installed. Proper placement of the photoeye assembly is necessary for optimum performance.
2. The photoeye assembly must be mounted on a structural post to accommodate the height requirement of approximately 8' to 10'. The post should be strong enough to prevent accidental movement of the photoeye assembly after installation.
3. Avoid conflicts with buildings and trees that can obstruct the photoeye assembly. Careful consideration should be given in the event the approach is on a hill. The detector should be mounted accordingly.
4. DO NOT aim the photoeye detector in direct sunlight. This will cause the system to temporarily blind itself during the period of direct sunlight. Use the furnished P.V.C. hood to help shield the photoeye from the sunlight.
5. Note the direction from which the emergency vehicles will arrive at the scene. If the arrival is from two directions, you should use two photoeye detector heads to achieve bi-directional coverage.
II. PHOTOEYE ASSEMBLY POST
1. Fabricate and install a 2" x 2" x 8' mounting post. Attach the provided PEA assembly to the top of the post to mount the assembly with two screws. DO NOT GLUE the assembly. You must be able to aim the photoeye assembly in the direction of the approaching emergency traffic. Now, remove the assembly and complete the wiring as described below.
III. MOUNTING THE CABINET
1. We suggest that you mount the control cabinet directly below the post, possibly inside of the wall or fence line. this will help prevent vandalism.
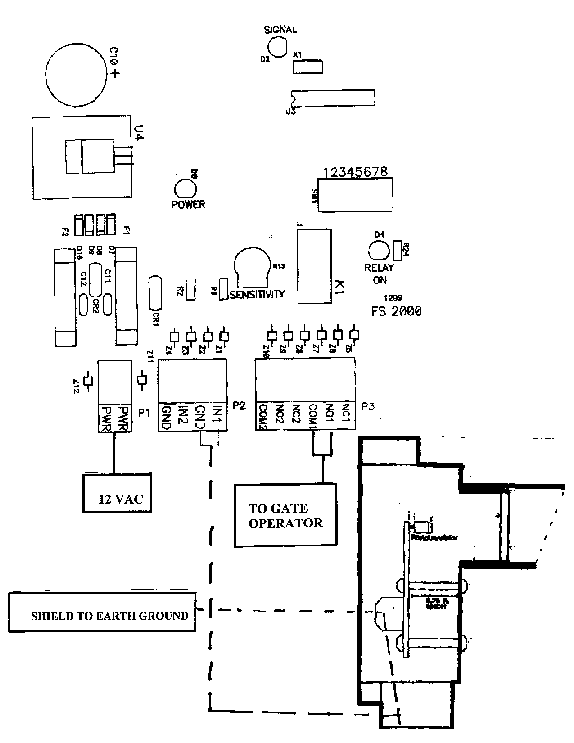
2. Remove the circuit board from the unit by removing the four screws and solder lug that hold the four corners. Try to discharge any static that you may have built up before handling the board.
3. Determine which of the two openings in the box will be used to run the wires into the cabinet. Run the wires through the 1/2 inch conduit into the bottom opening of the cabinet.
4. Carefully remove the knockout plug from the opening that will be used.
5. Mount the unit securely. Pull the cables described below into the cabinet and remount the circuit board.
IV. PULLING THE CABLES
1. Pull four cables to the control box: 1) an 18 awg, 2-conductor cablethat runs the power supply, and
2) an 18 to 24 awg, 2-conductor shielded cable that runs to the photoeye assembly.
DO NOTuse multi-conductor shielded cable . 3) an 18 awg, 2-conductor cable that connects to gate operator.4) 14 gage ground wire
V. MAKING CONNECTIONS
1. On the photoeye assembly remove the terminal block from the three pin connector at the bottom of the circuit board. Connect it to the 2-conductor shielded cable.
NOTE: #1 Shield
#2 SIG
#3 GND
NOTE: You must connect the shield of the photoeye assembly to the PC board green ground wire, which is attached at one of the four corners of the board. And this ground must be attached to earth ground.
Reinstall it on the terminal block pins. If you are going to use the AC power to run the system, connect the other end of the cable to the provided 12 VAC transformer . DO NOT plug the transformer into a 110 VAC outlet yet.
If you are going to use the DC power to run the system, connect the other end of the cable into a 12 VDC power supply. Please note that the Fire Strobe 2000 will not trickle charge a battery.
Therefore, your DC power supply must have its own charging circuit. DO NOT plug in the transformer for the power supply yet.
2. Remove the terminal block from the three pin connector at the bottom of the circuit board. Connect it to the 2-conductor shielded cable according to the following scheme if possible:
#1 PHOTOEYE DETECTOR (IN1 and GND)
#2 PHOTOEYE DETECTOR (IN2 and GND)
NOTE: You must connect the shield of the photoeye assembly to the PC board green ground wire, which is attached at one of the four corners of the board. And this ground must be attached to earth ground.
Reinstall it on the terminal block pins.
3. Ground the enclosure thoroughly. The detector contains a number of static-sensitive components that can be damaged destroyed by static discharge. The lug connected to the lower right stanchion is the point where connection to the ground should be made.
4. Plug in the 12 VAC transformer provided with the Fire Strobe 2000 or the 12 VDC power supply transformer (which you are providing) into a 110 VAC outlet. The red D6 LED near the middle left of the circuit board will light up when power is applied.
VI. RELAY CONFIGURATION
1. The system is provided with dual relay outputs, including common,N/O, and N/C terminals to be hooked up to the gate controller at either the relay or logic input. Note: The maximum rating of the Fire Strobe 2000 relay is 500 ma, 24 VAC.
2. Remove the relay terminal block from the six pin connector at the bottom right corner of the circuit board. Connect your common, N/O-N/C gate controller input to these terminals.
3. Acquisition delay time before operating the relay. These switches DO add together to give 4 possible selections.
SW1=off SW2=off-----500 milliseconds Factory setting
SW1=on SW2=off-----1 second
SW1=off SW2=on-----1.5 seconds
SW1=on SW2=on-----2 seconds
These times are nominal at 14hz or 840 flashes per minute. The times are shorter by about 20% at 1000 fpm and about 20% longer at 750 fpm.
4. NEW as of 8-1-2000 #3 on = STROBEWATCHä this new feature when turned on allows the FIRESTROBE 2000 to look for both the Opticom emitter and the STROBEWATCHä. It is our new optical recognition firmware, that searches for Police and other Emergency vehicle strobes and operates the relay on valid signals. If you feel you are receiving false inputs or do not want to use this, turn #3 off to deactivate this feature.
5. To set relay Hold-On-Time, set dip switch SW1 as follows:
#4 on = 30minutes
#5 on = 12 minutes
#6 on = 6 minutes
#7 on = 1.5 minutes
#8 on = 6 seconds
6. An operational test of the system should be performed to ensure proper gate operation. To check the system's performance, aim an operational strobe light or handheld tester at the photoeye detector assembly. Be certain that the strobe frequency is set at 840 flashes per minute or the required frequency in your fire jurisdiction. Note: The D2 LED on the pc-board will start to blink as the strobe light is activated. The D2 LED will then lock on when the strobe light and the detector are synchronized. The D4 LED will light at the same time as the relay locks on. The D4 stays on as the duration of the relay-on-time set is on the dip switch SW1 #4 - #8.
We recommend that you call your local fire department for a complete system test. System should be tested monthly.