|
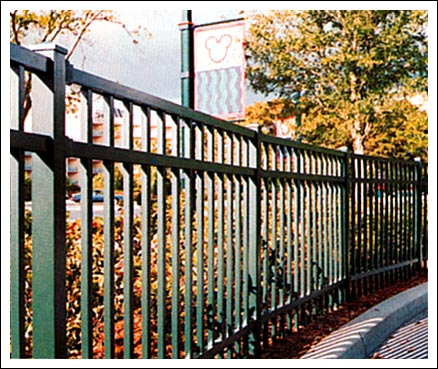
Elba Residential |
|
|
|
1.0
LAYOUT AND PLANNING CAUTION: BEFORE DOING ANY LAYOUT OR INSTALLATION OF FENCE OR GATES, BE AWARE THAT THIS MANUAL IS FOR RESIDENTIAL FENCE ONLY. ALL FENCE AND GATES MUST BE INSTALLED TO CONFORM WITH B.O.C.A. SPECIFICATIONS AND/OR LOCAL BUILDING CODE REGULATIONS. NOTE: FOR EASIER INSTALLATION, WE RECOMMEND AT LEAST TWO PEOPLE INSTALL THE FENCE. |
NOTE: LOCAL MUNICIPALITIES MAY REQUIRE A SETBACK FROM PROPERTY LINE TO FENCE LINE, OTHERWISE, IT IS RECOMMENDED TO BE 2" INSIDE THE PROPERTY LINE. IT IS IMPORTANT TO FIND OUT ALL THE REQUIREMENTS BEFORE INSTALLING YOUR FENCE. |
|
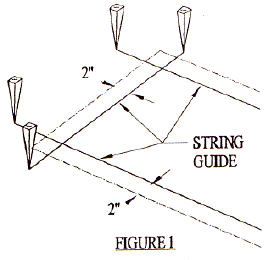
| 1.1) First, stake out the area to be
enclosed and run a string around the stakes as shown in Figure 1. The posts should remain
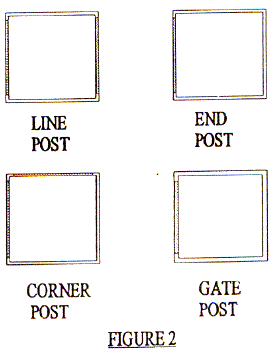
1/8" away from the string. 1.2) There are four (4) types of fence post, see Figure 2. The first is the line post, which has 1" square holes punched on opposite sides of the post. Second is the end post, which has the 1" square holes on only one side of the post. Third is the gatepost, which has 1" square holes on only one side and has a thicker wall. Finally, the corner post has holes punched on two adjacent sides. Separate the posts into their respective groups. |
|
1.3) At this point, use a rubber mallet to drive the post caps onto the post. Use caution not to damage the post or post caps. 1.4) Determine the amount of concrete mix you will need by consulting your local building supply dealer. Mix the concrete on the dry side to obtain a quick set and to give additional support when installing the fence sections. 2.0) Installation 2.1) For the ease of grass trimming under the fence, we recommend locating the bottom of the fence picket 2-3 inches above ground level. Before you begin, decide whether you would like the screws on the fence sections facing the inside or outside of your property, the installation is similar either way. Generally the screws are installed on the inside, giving a smooth outside appearance. |
|
| CAUTION:
IF YOU LIVE WHERE EXTREME GROUND FROST MAY OCCUR, EXTEND CONCRETE FOOTING BELOW THE FROST
LINE. NOTE: LOCAL MUNICLPALITIES MAY REQUIRE DIFFERENT HOLE DEPTHS. PLEASE VERIFY THAT THESE DEPTHS MEET ALL LOCAL BUILDING CODES. |
|
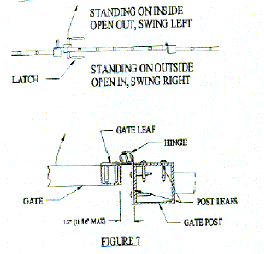
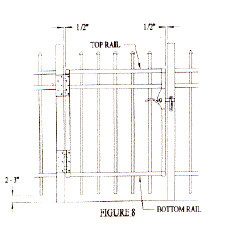
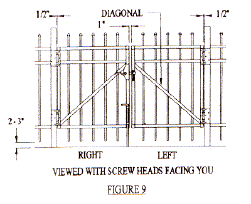
2.2) Using a post hole digger, dig the specified hole deep enough for the appropriate fence size and post size. 2.3) If possible, begin installing your fence with a gate as follows : A) For a single gate installation set the gate opening MIN 1 1/4" wider than the actual width of the gate (Example: a 36" wide gate will actually measure 35" wide and will require the actual gate opening to be 36 1/4" wide). B) For a double drive gate installation set the gate opening 2" wider than the actual width of the two gates (Example: Two 36" wide gates will actually measure 70" wide overall and will require the actual gate opening to be 72" wide). NOTE: FOR PROPER GATE OPERATION GATEPOSTS AND GATES MUST BE INSTALLED SO THAT A 1/2" MIN. GAP IS PRESENT BETWEEN THE LATCH SIDE OF THE GATE AND THE GATEPOST OR OPPOSING DOUBLE DRIVE GATE. SEE FIGURE 8 & 9. 2.4) Pay particular attention to the direction of the slots on the post while planning the installation of your gate, especially if your gate is at the end of the property line. See Figure 3 for an example. 2.5) Dig the postholes as recommended in Step 2.2 and set a post in each hole. While holding the posts perpendicular to the ground and the correct distance apart, proceed to fill the holes with concrete and tamp around each post until the concrete is approximately 2 inches below ground level. Attach gate after concrete has hardened. Verify that the posts are plumb, level, and the correct distance apart. |
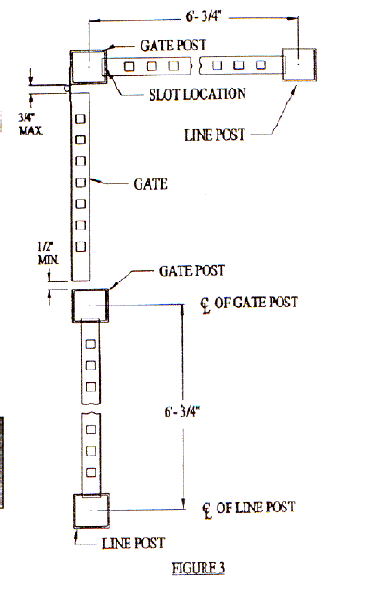 |
IMPORTANT: FOR PROPER GATE OPERATION, BE SURE THAT THE TOPS OF THE GATEPOSTS ARE LEVEL AND THE POSTS ARE PLUME. YOU MAY NEED TO REGRADE THE GATE OPENMG AREA SO THAT THE GATE WILL OPEN/CLOSE PROPERLY AND STILL MAINTAIN A 2-3" CLEARANCE BETWEEN BOTTOM OF TKE GATE AND THE GROUND LEVEL 2.6) Proceed to install all other gateposts that are NOT in the same straight line of fence. The installation of gates that are in the same line will be installed when the fence reaches that point. 2.7) After the gateposts have been set, proceed with the straight run of fence. Starting from the center of the gatepost, measure 6'-3/4" for the center of the hole for your first line post. See Figure 3. Proceed to dig holes at 6'-3/4" intervals. For a straight alignment, we recommend not to install more than 8 sections of fence at a time. |
|
| 2.8) Place a post in the next hole and place a sections of fence in the slots of the gatepost. Insert the other end of the fence section into the slots of the first line post. Pour a stiff mix of concrete into each hole. Check the post for being plumb and check alignment with string guide before the concrete sets. This procedure is repeated for the remaining sections of fence. |
|
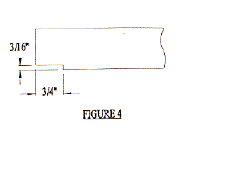
| NOTE: IF A FENCE SECTION IS
UNDER 6' LONG, A HACKSAW IS NEEDED TO CUT THE FENCE TO THE PROPER LENGTH. ALSO, A
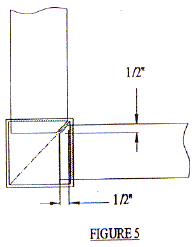
3/16" x 3/4" NOTCH IS REQUIRED FOR THE NEWLY CUT ENDS. SEE FIGURE 4. IMPORTANT: IN ORDER FOR TWO SECTIONS OF FENCE TO FIT INTO A CORNER POST, A 45-DEGREE MITER ON THE FENCE RAIL MUST BE CUT. SEE FIGURE 5, NOTE: FOR A NEAT APPEARANCE, WE RECOMMEND REVIEWING THESE THREE STEPS AFTER COMPLETING EVERY 8 SECTIONS OF FENCE THAT ARE INSTALLED A) Sighting along the top horizontal rails, the fence should appear to be one continuous line. B) Properly aligned and plumb posts will appear to be connected when viewed from the end of a straight section of fencing. C) Check to make sure that the posts are parallel to the pickets NOTE: BECAUSE OF THE ABILITY OF THE FENCE TO RAKE, THE FENCE MAY FOLLOW THE CONTOUR OF THE TERRAIN, RATHER THAN HAVING SHARP UP AND DOWN FENCE PATTERNS. ON UNUSUALLY ROUGH GROUND, YOU MAY RAISE OR LOWER A POST TO FOLLOW THE CONTOUR OF THE TERRAIN. 2.9) Continue adding sections offence until you get to either the end of the line or the next gate. At this point, add either a wall mount casting, a corner, end or gate post whichever is applicable. |
|
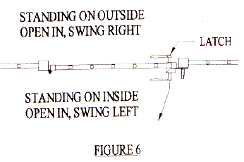
3.0) Gate Installation 3.1) After the concrete has set, the gate can be installed. With proper installation of the gateposts, there will be a 1/2" allowance between the gate and each post. Decide at this point whether the gate is to open inward or outward. See Figure 6 for examples. Under the assumption that the installer is standing on the outside of the fence, opening outward means opening toward the installer and hinging left means that the hinge is on the installer's left side. Notice the position of the hinges in Figure 9 in relation to the diagonal. To prevent the gate from sagging, install the hinges on the side of the gate where the diagonal, if present, is at the bottom. All gates are available as left or rights to provide smooth appearance on the outside. |
|
| NOTE: IT IS IMPORTANT TO MOUNT THE GATE IN SUCH A WAY SO THAT THE HORIZONTAL GATE RAILS ARE IN LINE WITH THE HORIZONTAL RAILS OF THE FENCE | |
| 3.2) Place the gate on blocks
at the correct elevation and clamp the hinge post leafs to the post. The outer hinges
should be placed within 1/8" of the gate top and bottom rails or as far apart as
possible for the best performance. Remove the gate and verify that the hinge post leafs
are completely flush and plumb with the mounting surface, to avoid binding. Attach the
hinge to the post by drilling 7/64" pilot holes and fastening with screws provided.
If additional hinges are used, equally space them between the two previously installed
hinges. 3.3) Center the gate into the opening. Check elevation, plumb and clearance, and clamp the gate to the hinge gate leafs. Drill 7/64" pilot holes and attach with the screws provided. 3.4) If the hinge is to be mounted on a flat surface you may need to shim out the hinge post leafs so that the hinge does not rub or bind against the mounting surface. 3.5) The screws provided with the hinge are intended for securing the hinge to Delgard posts & gates. |
|
|
|
|
| If the hinge is to be mounted
to a masonry column, wood, etc., ask your local building supply dealer to recommend
appropriate fasteners for your mounting application. NOTE: IF: YOU REQUIRE THE GATE TO BE SELF-CLOSING, USE THE ADJUSTABLE SPRING HINGES PROVIDED TAKING CARE TO FOLLOW THE INSTRUCTIONS PROVIDED WITH THE SELF-CLOSING HINGES . 3.6) For a double gate installation, be certain you have a left and right hand gate and install them as shown in Figure 9. The top of the diagonals, if present, must run towards each other between the gates. The mounting procedure is the same as a single gate. 3.7) Test the gate for smooth free-swinging operation, then proceed to install the latch hardware as needed per the latch installation instructions. |
|
4.0) DROP RODS NOTE: THE DROP RODS ARE GENERALLY MOUNTED ON THE: INSIDE OF THE GATE. 4.1) Mount a drop rod guide two (2) inches from the bottom of the gate by drilling two (2) 7/64" holes and fastening the guide with two (2)# 6 x 1/2" self-tapping screws. Fasten the second guide 20 inches above the bottom of the gate in the same fashion as the first guide. Before fastening the second guide, use the drop rod to align the guides. Next, install the drop rod catch high enough so that the rod will not drag on the ground while opening or closing the gate. Be certain not to install the catch too high so that the rod pulls out of the bottom guide. The fastening procedure is the same as the other two guides. |
|
| 4.2) The final installation step is
completed after the concrete around each post has hardened sufficiently. Fasten the post
to the fence using the # 8 x 1" self-drilling, self-tapping screws provided. Be
careful not to over-torque the screw as this will weaken the screw and possibly shear the
head off. 4.3) To complete your fence, after the cement has hardened, replace dirt and grass around the posts. |
 |
| 5.0) REGULAR MAINTENANCE 5.1) Check for proper gate operation daily when gate is in use Lubricate or adjust if necessary. 5.2) Keep gate and fence area free of debris and climbable objects. 5.3) Check fasteners for tightness and replace any worn or damaged parts. |
|